Introduction
So far, in our tutorials, we’ve only created single-scenario examples. But when performing financial analysis, that’s unusual - generally you should evaluate a range of potential scenarios and outcomes. The most basic example would be creating a base case, an upside case, and a downside case.
This tutorial is going to build off of our accretion / dilution tutorial. We’re going to show you how to create and test multiple cases, or scenarios. You can apply this approach to any financial model you build.
Rationale
Below are a few reasons to include case functionality in your models.
Inherent uncertainty
When projecting financials, nothing is certain. Will XYZ business unit outperform this year? What will the oil price be? Will shipping costs increase or decrease? You get the idea.
We need to evaluate the financial impact of numerous variables. For example, if shipping costs increase but growth also outpeforms, does that lead to a higher valuation?
Efficiency
Let’s go back to our basic accretion / dilution template (you can download it here). If you want to change a variable (and see how it impacts accretion), you have to overwrite the hard-coded value. Then, if you want to reverse the change, you have to replace the new value. Especially if you’re testing the impact of multiple variables simultaneously, this manual approach becomes inefficient pretty quickly.
Make it explicit
Even if you don’t care about efficiency, it’s still valuable to explicitly define your cases and the variables you’re testing - separate from the main model mechanics. Defining and listing your cases can help you think through what you’re testing. Should I add more variables? Is this too many? Have I defined a downside case?
Teamwork
Furthermore, when you’re working as part of a team, it’s important to define the cases, so that other people can easily open up the model and switch the running case / scenario.
How to add cases to a model
Now let’s add some cases to our basic accretion / dilution template. You can follow along step-by-step, or you can check out the completed version.
Define your variables
The first step is to define your variables - what you’re going to be testing. We’ll be sensitizing / testing the following variables:
- Offer premium
- Consideration mix (% Cash / % Stock)
- Target EPS
- Interest rate on acquisition debt
- Synergies
Build cases tab
Now that we’ve decided on our variables, let’s build out the cases.
Create a new tab (we like to call this “MCASE“ - stands for “Main Case” or “Master Case”)
Create 1 column per variable - create 1 column for each variable that you’re testing. We’ll create the following columns:
- Offer Premium (%)
- % Cash
- % Stock
- Target EPS (2020E)
- Target EPS (2021E)
- Target EPS (2022E)
- Acquisition debt interest rate (%)
- Run-Rate Synergies ($mm)
We like this columnar approach, because (among other reasons) it makes it easy to add variables - just add more columns. You don’t have to move your existing cases or alter the other variables.
Create label and case column - we like to add 1 column for labels (e.g., “Base Case”) and 1 column for case numbers (1, 2, 3, etc.). These will be the two leftmost columns. Here’s what your column headers should look like:

Create “Running” row directly beneath the header row(s). This row will display our running case.
- Make the row light gray - this will visually differentiate it from the rows below
- Make the label “Running:”
- Put a box around the case number column (for this row) and center the number. This will be the cell that defines which case is running
- The remaining columns will use the offset function to pull the variables for the specified running case
NOTE: offset might be the most useful function in Excel, so it’s important to fully understand it. The syntax is as follows:
cell value = offset(reference cell, offset rows, offset columns, target rows, target columns)
That might seem like a lot, but it’s actually quite simple. Offset is used to lookup a cell value a specified number of rows and columns away from the reference cell.
- reference cell = where you start from
- offset rows = how many rows to offset. Here, we use the running case number, so if case 1 is running, we move down 1 row; if case 2 is running, we offset 2 rows…
- offset columns = how many columns to offset. Here, we offset 0 columns, because we only want to vary, or offset, the rows. The columns are already lined up
- target rows (always set this = 1)
- target columns (always set this = 1)
Sometimes, it’s easier to see an example and play around with it. Check out the completed version.
- Create individual cases beneath the running row. You can create whatever cases you want. We’ve created the following:
- Base Case
- Upside Case
- Downside Case
- Offer Premium / Merger Consideration Sensitivity Cases
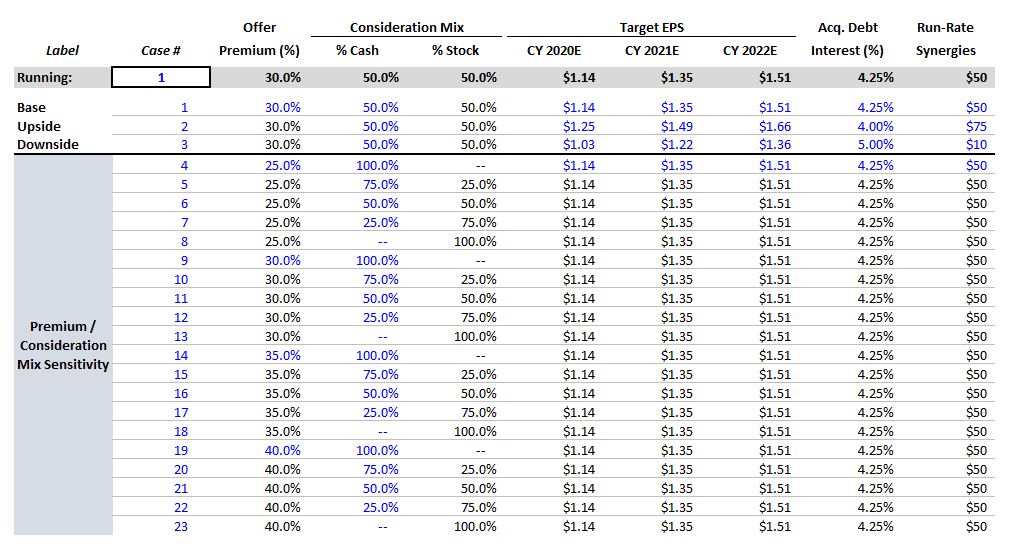
Here’s what our completed cases tab looks like:
Link cases tab to model
Once you’ve built your cases, you can link the running variables back to your model. For example, you can link the target EPS numbers back to the running row on the MCASE tab.
When you change the running case, the entire model updates. Check out the completed version, and let us know if you have any questions.