1. Introduction
This guide will provide basic instruction on modeling LBOs. Specifically, you will learn:
- How to build a full-featured LBO model
- Some key Excel functions
- Core financial concepts and terminology
- How to model different types of debt
This guide will not serve as:
- An introductory accounting course
- A “from-the-ground-up” Excel course
If this model is too complicated, start with our Easy LBO Guide.
LBO Overview
LBO means “Leveraged BuyOut.” Two main characteristics differentiate LBOs from other types of acquisitions:
- Instead of a “corporate” buying another “corporate,” e.g., Amazon buying Whole Foods, in a LBO, a Financial Sponsor (a.k.a. private equity firm) is the buyer
- The sponsor uses a mix of debt (hence “Leveraged”) and equity to buy the company. The equity is the money that the financial sponsor invests, and sponsors raise debt financing from banks / the capital markets.
Do sponsors buy the whole company?
In LBOs, the sponsor generally buys a controlling stake in the company. Management and/or the seller may retain some equity.
Why does a sponsor use debt?
A sponsor uses debt so that they can buy the company with less of their own cash (equity). Over time, as the company pays down its debt, the equity value will grow as a percentage of the total enterprise value, thereby increasing the value of the sponsor’s investment.
Total enterprise value (TEV) = equity value + net debt.
If enterprise value is increasing and net debt is shrinking, the sponsor is simultaneously using two levers to increase their equity value:
- growing TEV and
- increasing the percentage of TEV owned by equityholders.
Debt Primers
If you don’t have a decent understanding of the different types of debt used in LBOs, spend ~15 minutes perusing the guides below. A quick read will give you the background knowledge you need.
2. Getting Started
Download the following files:
- Blank Model - you’ll build your own model with this template.
- Completed Model - for your reference. This Excel file includes a tab for each step of the tutorial. Note: the numbering starts at 3; the first step is the tab labeled “LBO_3” - “3. Filling in Transaction Assumptions.”
You should try to follow along, step-by-step, building your own model from the blank file.
Our model template is built vertically within a single tab, and is divided into the following sections:
- Transaction Assumptions
- Income Statement
- Working Capital Schedule
- Balance Sheet
- Statement of Cash Flows
- Debt Schedule
- Interest Expense Schedule
- Credit Metrics
- Returns Calculations
For simpler LBOs, like this one, we prefer a single-tab, vertical format, because it makes it easier to link between sections and trace dependencies.
The working capital schedule and balance sheet are often unnecessary, but we’re including them here so you can see how all the pieces fit together. Likewise, the debt schedule and interest expense calculations are usually bundled together, but since they’re a bit longer here, we split them up.
3. Filling in Transaction Assumptions
At the top of the “LBO” tab, you can find the Transaction Assumptions section. This is where we’re going to start, and there’s a lot going on, so we’ll go through a brief overview:
- The Sources & Uses section is one of the key parts of any financial model. Quite literally, it describes what your sources of cash are, and what you’re using them for. In LBOs, your sources will be a mix of debt and equity financing, and your main use will be purchasing the target company (“Purchase Equity”)
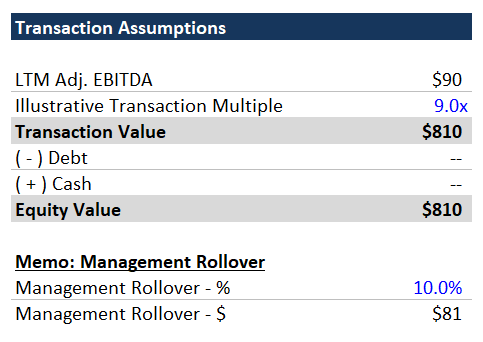
- The Transaction Assumptions section is where we’ll calculate the transaction value / equity value. In an acquisition, “transaction value” is equivalent to “total enterprise value” (TEV). Therefore, equity value = transaction value - net debt. We’re going to assume a cash-free, debt-free transaction, which means the sponsor is buying the company with no debt to refinance and no excess cash (there will be a little bit of operating cash).
- The Financing Assumptions section contains financing assumptions for various tranches of debt (we provide these). We’ll show you how to use these inputs to perform the financing calculations required in a LBO.
Transaction Value & Equity Value
- Link the LTM Adj. EBITDA from the income statement (use 2016A - we’re assuming an illustrative transaction close at FYE 2016).
- Calculate the Transaction Value (LTM Adj. EBITDA x Transaction Multiple).
- Link the “Cash On-Hand” from Sources as the cash balance.
- Link “Refinance Existing Debt” from Uses as the debt balance.
- Equity Value = Transaction Value - Debt + Cash
Hint: transaction value and equity value should be the same in this case (cash-free, debt-free).
Management Rollover
In a management rollover, the management team agrees to “roll over” part of their equity stake as an investment alongside the financial sponsor. A management rollover is not uncommon, and sponsors like it, because it keeps the management team even more incentivized. If check size (how much money a sponsor is able to invest in a single deal) is a concern, a management rollover can help mitigate that.
Here we’re assuming a 10% rollover. This means that the management team owns at least 10% of the existing equity and agrees to keep 10% invested alongside the sponsor. 10% is probably a bit high, but not unheard of. Multiply the rollover % by the calculated equity value.
4. Purchase Accounting
We’re using overly simplified purchase accounting, because frankly, purchase accounting isn’t very important for LBOs.
The core concept of purchase accounting is that the value paid for an asset must be capitalized on the balance sheet. In the case of an acquisition, the asset being acquired is the company itself and its bundle of assets and liabilities.
In most acquisitions (including this one), the price paid exceeds the existing book value of net assets. Therefore, the purchase price is allocated to the net assets by writing them up to fair value.
Example: you buy a manufacturing company for $500mm. The net assets have a book value of $100mm, so there’s a $400mm delta, but the fair value of the company’s manufacturing PP&E is actually $200mm. On the balance sheet of the post-acquisition company, the PP&E is written up to $200mm. But that doesn’t cover the full delta - so what next? Any remaining purchase price is allocated to an indefinite-lived intangible asset called goodwill (“indefinite-lived” is just an accounting term that means it doesn’t have a finite life. Theoretically, it could last forever).
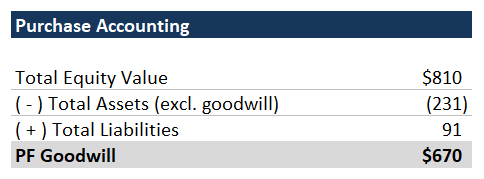
Here we’re assuming that the book value of net assets (excluding the existing goodwill) is equal to fair value, so the entire excess purchase price is allocated to goodwill.
- Set Total Equity Value equal to the Equity Value you just calculated above.
- Link the appropriate asset & liability fields from the balance sheet.
- Remember to subtract out the existing goodwill (goodwill functions as the plug; we don’t care about the prior plug – we’re calculating it again here).
5. Debt Financing
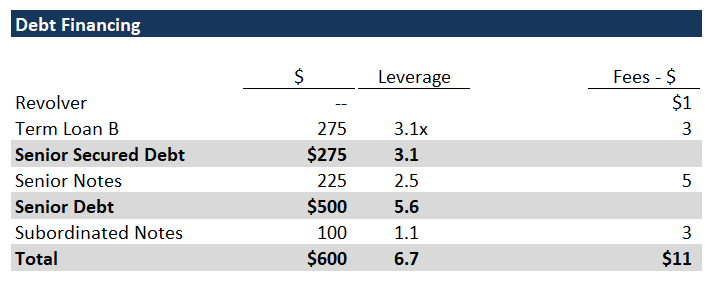
Now we’ll fill out the Debt Financing section below the provided financing assumptions. Here we’ll calculate the actual amount of debt raised and associated fees.
- For the Revolver, link to the hard-coded “Revolver Draw” assumption under Sources. The assumed draw is $0, which is standard practice. It would be unusual to fund the transaction with the Revolver. The Revolver functions as a safety net, and it is used to fund any short-term cash shortages.
- Calculate the $ raised for the Term Loan B, Senior Notes and Subordinated Notes using the supplied leverage multiples and LTM Adj. EBITDA.
- Simply multiplying the leverage multiple by Adj. EBITDA can result in oddly specific debt balances (e.g., $179.4mm of senior notes), whereas companies raise round numbers of debt.
- Use the mround function and the “Minimum Debt Increment” assumption found under Other Assumptions to get nice, round debt balances for each tranche:
=mround(leverage * EBITDA, minimum debt increment)
- Calculate the financing fees for each tranche by multiplying the calculated debt balance by the fee % from the Financing Assumptions table.
- For the revolver fee, multiply the financing fee % by the revolver commitment.
6. Sources & Uses
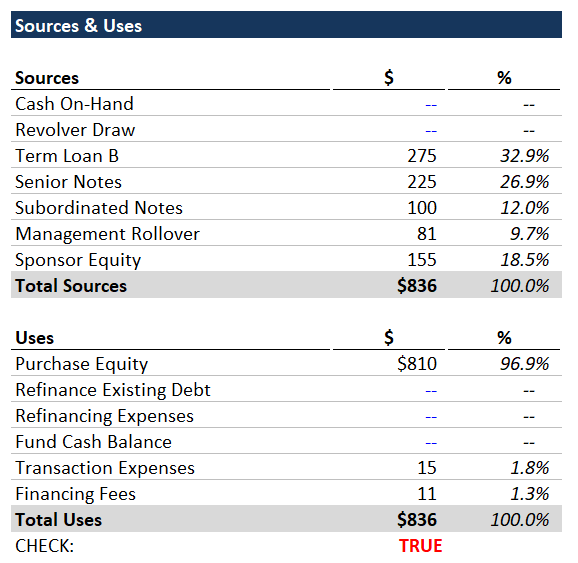
Now we’ll fill out the Sources & Uses using our work from the preceding sections.
- Under Sources, link the individual debt tranches from the Debt Financing section.
- Link Management Rollover from Transaction Assumptions.
- Under Uses, set Purchase Equity equal to Equity Value from Transaction Assumptions.
- Link Transaction Expenses from Other Assumptions.
- Link the Total Financing Fees from the Debt Financing section.
- Now the only remaining line item is Sponsor Equity; set it equal to Total Uses - the sum of all other sources.
Sponsor Equity = Total Uses - Sum(All other sources)
Your Sources & Uses should now balance.
7. Income Statement
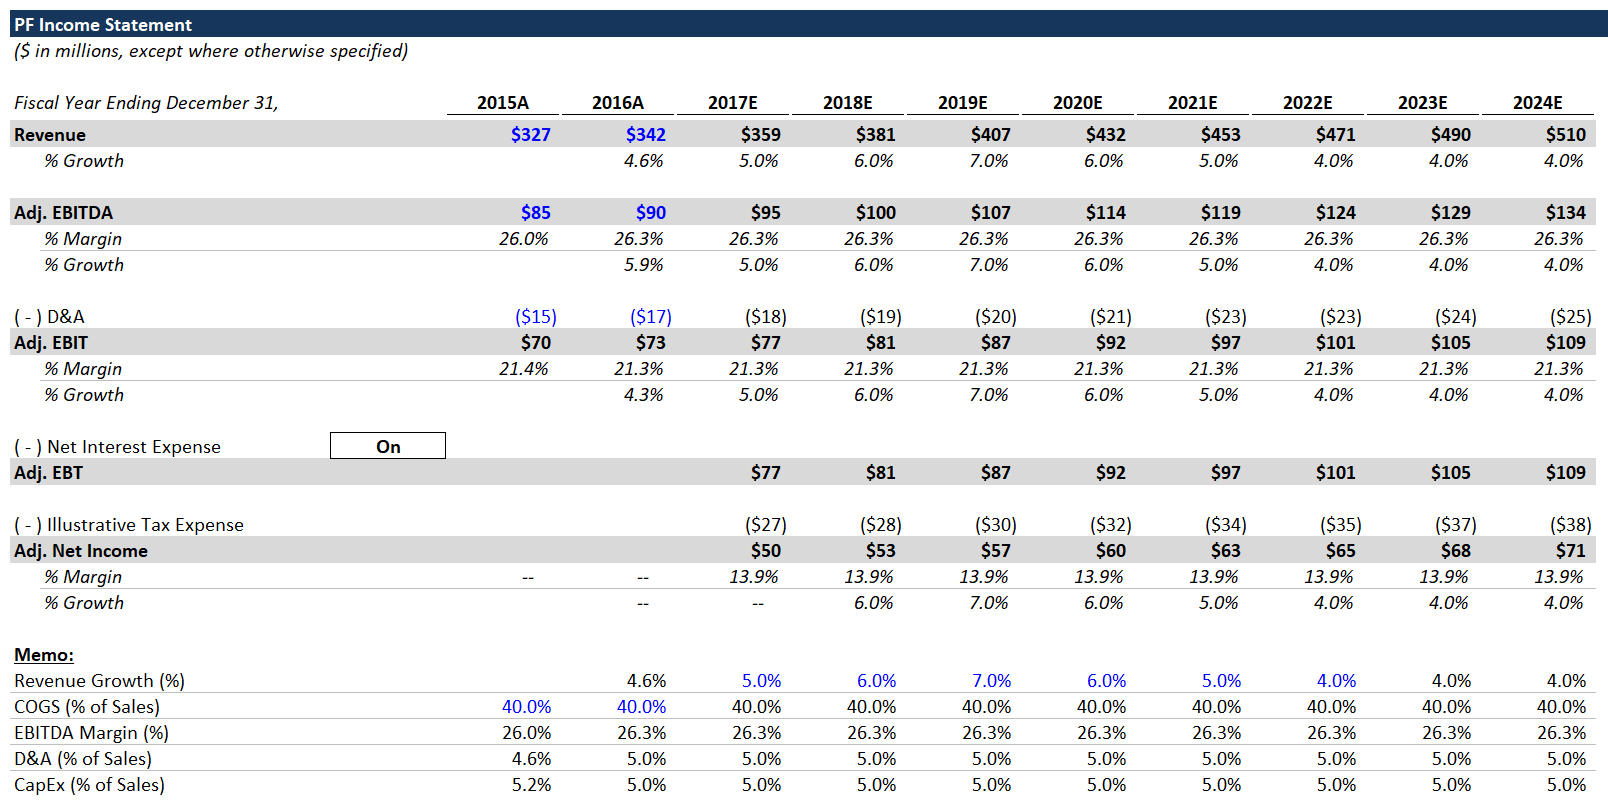
Let’s fill out the PF Income Statement. The historical revenue, EBITDA and D&A are already in place, and we’ve included all the assumptions you need in a memo below the income statement.
- Grow Revenue by multiplying the prior year by (1 + growth rate).
- Calculate projected EBITDA by multiplying margin by Revenue.
- Calculate D&A with the % of sales.
- Subtract D&A from EBITDA to arrive at EBIT.
- Leave Net Interest Expense blank for now, but calculate EBT as EBIT + blank Net Interest Expense row.
- EBT equals EBIT for now, but we will add Net Interest Expense in the future.
- Calculate tax expense by multiplying the tax rate found in Other Assumptions by EBT.
- Calculate Net Income by adding the tax expense (negative) and EBT.
8. Working Capital Schedule
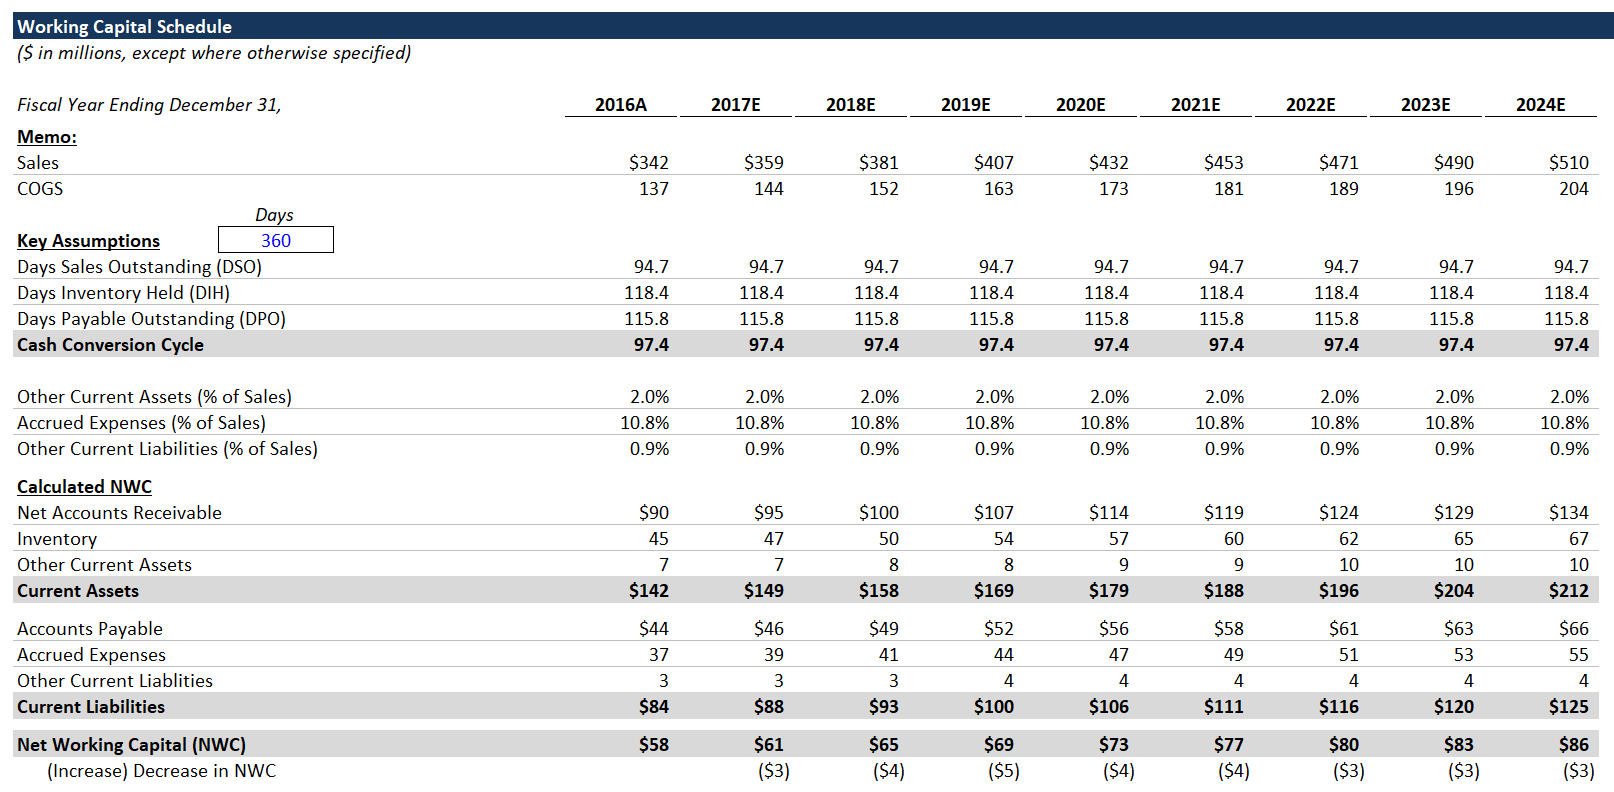
We’re going to use Revenue, COGS and historical working capital to build out the Working Capital Schedule.
- Set Sales equal to the Revenue line in the Income Statement.
- Calculate COGS by multiplying Sales by the COGS memo line in the Income Statement.
- Link the 2016A working capital line items from the Balance Sheet:
- Net Accounts Receivable
- Inventory
- Other Current Assets
- Accounts Payable
- Accrued Expenses
- Other Current Liabilities
We’ll use these to calculate the historical ratios, which will be the basis for our projections.
- Calculate the historical DSO, DIH, DPO and % of sales metrics. For metrics based on days, use the provided 360-days cell.
- DSO = Net Accounts Receivable / Sales * 360 Days
- DIH = Inventory / COGS * 360 Days
- DPO = Accounts Payable / COGS * 360 Days
Cash conversion cycle is a common metric for working capital efficiency. Cash conversion cycle = DIH + DSO - DPO. Time that cash is invested as inventory + time that the accounts receivable are outstanding - the time that the company can delay paying its account payables.
- Once you’ve calculated the historical ratios for 2016A, set the ratios in all the future years equal to 2016A. This is a simplifying assumption - in a real LBO, it would be important to diligence all these assumptions and have a detailed view on how/why a company’s working capital profile might change.
- By holding these ratios (and COGS as % of Sales) constant, we’ve made working capital a linear function of Sales.
- Use the projected working capital ratios (held constant) and the projected Sales & COGS to calculate the projected working capital line items.
- Example: Projected Inventory = DIH / 360 * COGS
- Calculate Net Working Capital (Current Assets - Current Liabilities) in each year.
- Calculate the (Increase) Decrease in NWC as: prior year Net Working Capital - current year Net Working Capital. We do it this way (so that increases are negative), because we’re going to link this line directly to the Statement of Cash Flows. Increases in NWC are a use of cash, and decreases are a source of cash.
9. PF Balance Sheet
We’re assuming that the transaction closes at Fiscal Year End 2016. FYE 2016 has already come and gone, but best practice is to use the latest available balance sheet. For a public company, you’d use the latest 10-K/10-Q.
The historical 2016A balance sheet that we have here is the company’s standalone balance sheet (assuming no transaction). We’re going to calculate the PF 2016 balance sheet - what the balance sheet would look like immediately after closing the transaction.
When preparing a PF balance sheet, incorporate all line items from the Sources & Uses. You can set balance sheet line items that aren’t affected by the Sources & Uses equal to the standalone balance sheet.
- Set all working capital line items equal to 2016A:
- Net Accounts Receivable
- Inventory
- Other Current Assets
- Accounts Payable
- Accrued Expenses
- Other Current Liabilities
- Set Net PP&E and Other Noncurrent Liabilities equal to 2016A.
- The PF Shareholders’ Equity = Sponsor Equity + Management Rollover - Transaction Expenses. You can completely ignore the historical equity balance.
- Debt = sum(all sources of debt financing).
- Make sure to include the line for the revolver draw even though it’s 0.
- Other Noncurrent Assets = 2016A balance + Financing Fees.
- Financing Fees are capitalized and then amortized over the term of the debt instruments, and best practice is to stick the capitalized fees in Other Noncurrent Assets.
- Goodwill = PF Goodwill, which you calculated in the Purchase Accounting section.
- Set Cash & Cash Equivalents = 2016A cash balance - “Cash On-Hand” + “Fund Cash Balance.” Since these latter two are both $0, PF cash = 2016A cash.
Your PF balance sheet should now balance.
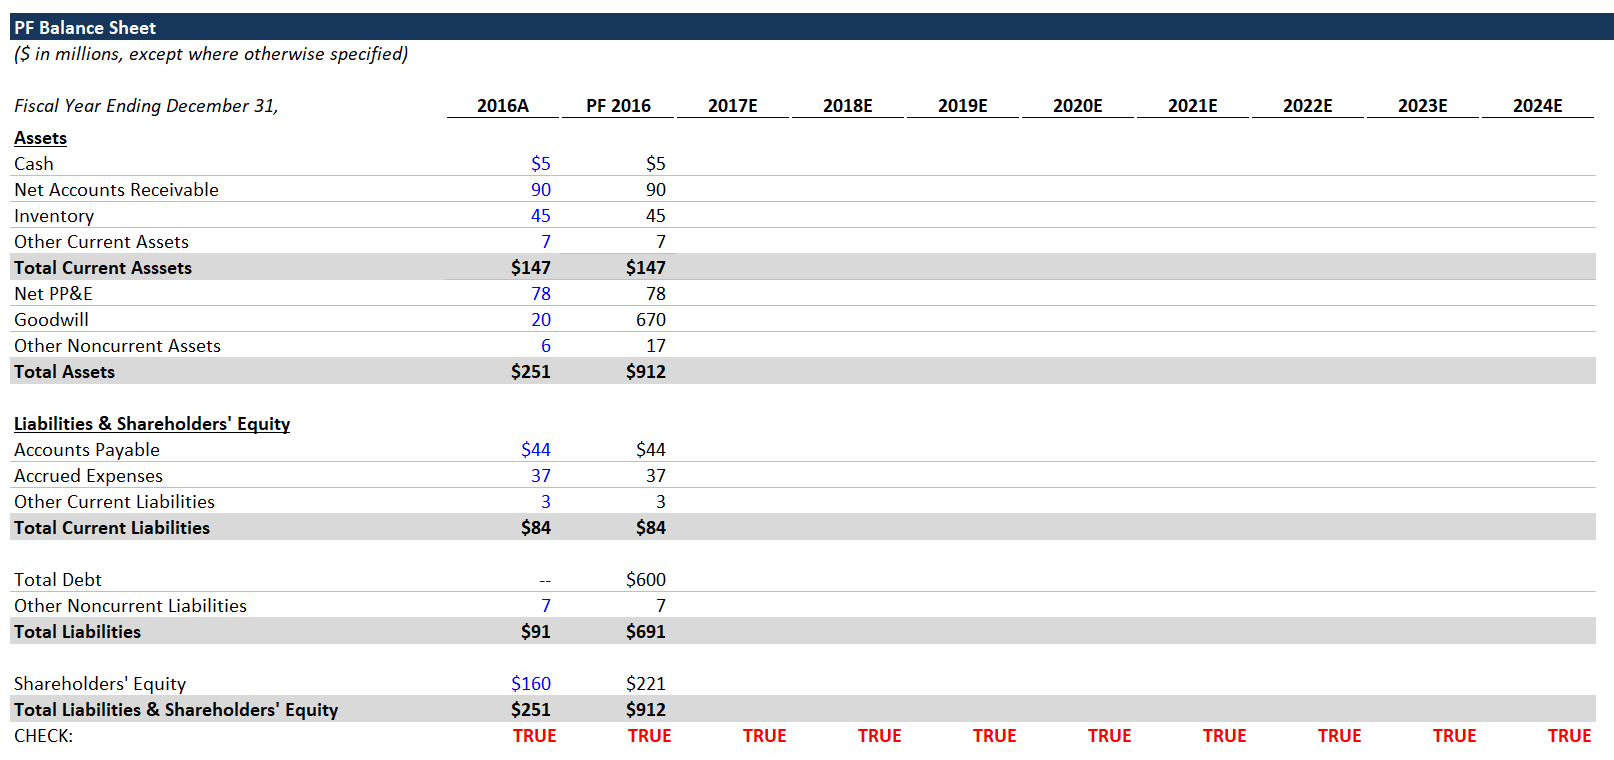
Getting the balance sheet to balance can be tricky. A good way to think about it is that if the historical balance sheet balances and the sources and uses section balances, the combination should also balance. Every line item in sources & uses must be accounted for in the PF balance sheet. The sources are generally straightforward. Goodwill and any purchase accounting write-ups are the bridge between the equity purchase price and historical net assets.
10. Statement of Cash Flows
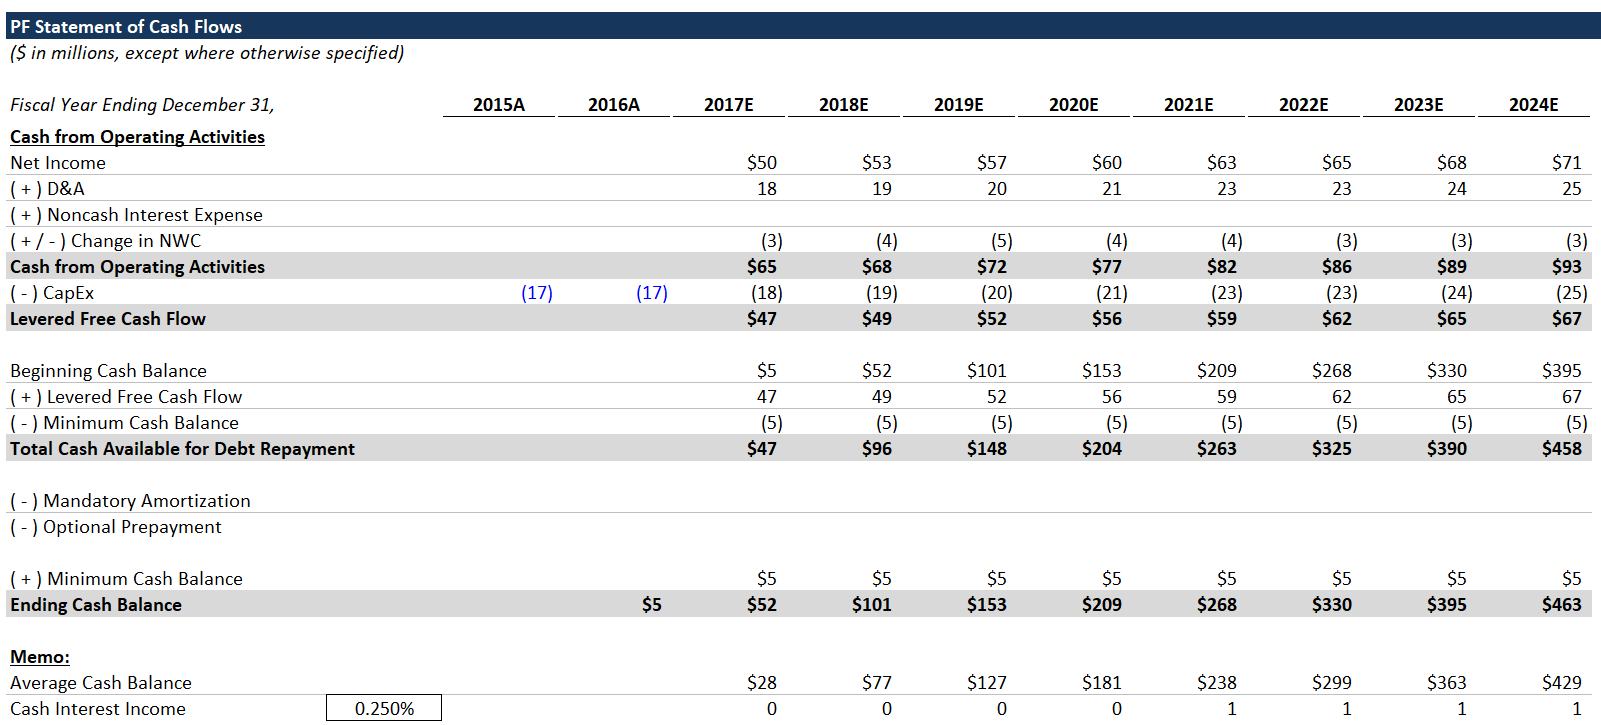
- Link Net Income from the income statement. You can ignore the historical years; we only care about the cash flows going forward.
- Add back D&A (noncash expense).
- Link to the (Increase) Decrease in NWC from the Working Capital Schedule.
- Leave Noncash Interest Expense blank for now.
- Calculate projected CapEx as a % of Revenue (assumption found in the memo section below the Income Statement).
- Add up the Cash from Operating Activities and Levered Free Cash Flow lines.
- Link the 2016 Ending Cash Balance from the PF 2016 cash from the balance sheet.
- Set the 2017E Beginning Cash = to the 2016 Ending Cash (in statement of cash flows).
- Calculate Cash Available for Debt Repayment:
- Add Levered Free Cash Flow.
- Subtract the Minimum Cash Balance (from “Other Assumptions” section).
- The Minimum Cash Balance ensures that a minimum amount of cash remains - the cash needed for ordinary operations.
- Leave the Mandatory Amortization and Optional Prepayment lines blank.
- Add back the Minimum Cash Balance above Ending Cash.
- Then calculate Ending Cash:
Ending Cash = sum(Cash Available for Debt Repayment, Mandatory Amortization, Optional Prepayment, Minimum Cash Balance).
We add back the Minimum Cash Balance, because it was never spent. It was just taken out of Cash Available for Debt Repayment. - Carry over these formulas through the rest of the projection period.
Interest Income
Now we’ll calculate Cash Interest Income. Although it’s immaterial, it’s still best practice to include this. We’re going to use an “if” statement to manage circular references.
Average Cash Balance = if (CIRC = 1, average(Beginning Cash, Ending Cash), Beginning Cash)
The circ is found under “Other Assumptions.”
Calculate Cash Interest Income by multiplying the provided interest rate by the Average Cash Balance for each year.
11. Debt Schedule
- To start, link the PF 2016 ending debt balances from the Sources & Uses. Sum them up in the total line.
- Calculate the Undrawn Revolver Commitment:
Undrawn revolver commitment = max(0, revolver commitment - the drawn balance)
Include “max(0, “ because it should never be a negative number. You can drag this formula across. - In 2017E - 2024E, link the Cash Available for Debt Repayment from the Statement of Cash Flows.
Mandatory Amortization
We’ve already included the amortization schedule for you, but generally, term loans are the only debt instruments with mandatory amortization. Mandatory amortization consists of regular scheduled principal payments. Senior notes and bonds pay interest every year, but principal is only repaid at maturity.
Calculating the mandatory amortization is not as simple as multiplying the % by the beginning principal amount.
Mandatory Amortization = -max(0, min(PF balance * annual schedule %, prior year ending balance))
The “max(0, min(“ clause is a great way to constrain the value of a cell - never falls below 0.
In English, mandatory amortization is the lesser of the scheduled amortization or the remaining balance at the beginning of the year (the beginning of this year = the end of the prior year). Remember to lock the PF 2016E debt column when multiplying by the annual amortization %.
Cash Available for Optional Prepayment = Cash Available for Debt Repayment + Total Mandatory Amortization
Optional Prepayment
Calculating Optional Prepayment can be tricky, especially for the Revolver. Remember that the Revolver functions as a safety net. Therefore, if Mandatory Amortization exceeds the Cash Available for Debt Repayment (resulting in negative Cash Available for Optional Prepayment), the company will draw on the Revolver to make up the gap. On the other hand, if there’s cash left over, the company should pay down any outstanding Revolver balance.
This is best represented using an “if“ statement:
Revolver Optional Prepayment = if(Cash Available for Optional Prepayment > 0, -max(0, min(last year’s ending Revolver balance, Cash Available for Optional Prepayment)), -min(0, Cash Available for Optional Prepayment))
Word to the Wise
You’ll notice we’re not limiting the revolver amount by the revolver commitment. As one astute reader pointed out, this is technically wrong. We’re doing it this way, because if you limit the revolver but have insufficient cash flows, you wind up with a negative cash balance, which is also wrong.
In practice, if your LBO model draws on the revolver at all, that’s cause for concern, and you likely need to reevaluate your assumptions. The revolver is a financing source of last resort, and you should not be drawing on it in your forecast.
The Optional Prepayment for the other debt tranches is more straightforward. And by stacking debt tranches like this, we can use one formula to apply to all tranches.
The debt tranches are organized in order of priority – the Revolver gets paid down first, then the Term Loan B, and then the notes. So the Optional Prepayment for the Term Loan B depends on if there’s anything left over after paying down the Revolver. The notes have the same relationship with the Term Loan B, etc.
You can apply this formula to the Optional Prepayment of all remaining tranches (excluding the Revolver):
Tranche Optional Prepayment = -max(0, min(prior year ending balance + Mandatory Amortization, Cash Available for Optional Prepayment - all prior Optional Prepayments)))
Let’s explain this. The Optional Prepayment for a given tranche must be the lesser of the remaining balance (last year’s ending balance + this year’s Mandatory Amortization) and the Cash Available for Optional Prepayments - all preceding (higher priority) Optional Prepayments this year.
Compare your formula with the completed version and drag across all Optional Prepayment cells.
Ending Debt Balances
Now that we have the Mandatory Amortization & Optional Prepayment for each tranche, we can calculate the ending debt balances for each year.
- Go back up to the ending debt balance section and set each 2017 ending balance:
Tranche balance= max(0, prior year ending balance + Mandatory Amortization + Optional Prepayment).
- Carry this formula across for all tranches and projected years.
- Finally, link the Total Mandatory Amortization and Total Optional Prepayments back to the Statement of Cash Flows.
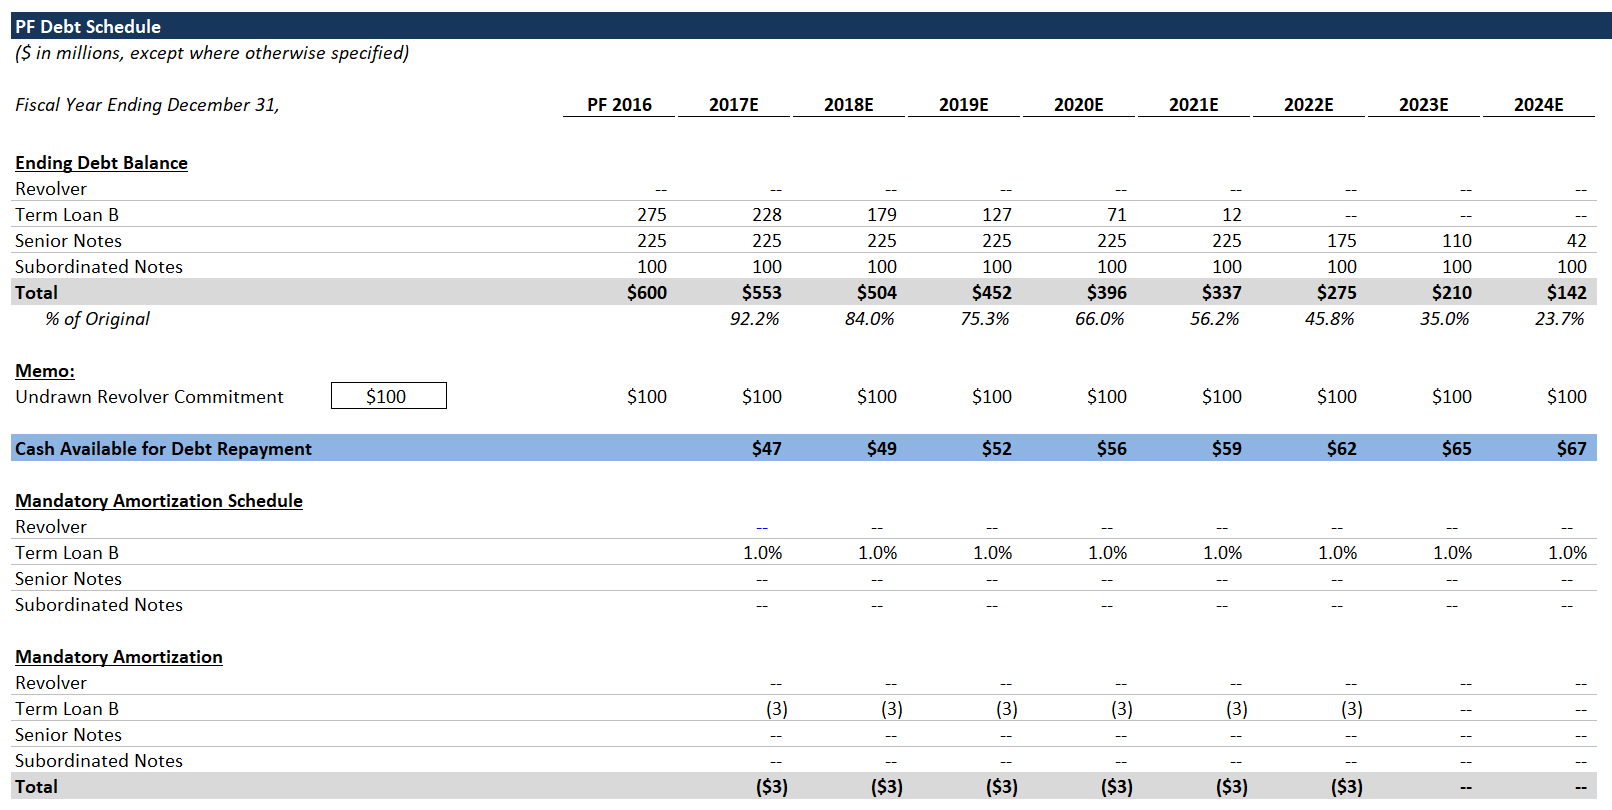

Note: typically, you can’t repay outstanding notes as soon as you’ve paid down the Term Loan B, as we’re doing here. Debt investors who buy high-yield bonds generally don’t want to be repaid early without a fee. If the company is doing well enough to repay the debt early, that means that the company is less risky, and investors would probably want to keep their capital deployed. Early repayment of notes is a simplifying assumption, and it’s typical to model LBOs this way. Alternatively, you could accrue a cash balance and/or refinance the notes.
12. Interest Expense Schedule
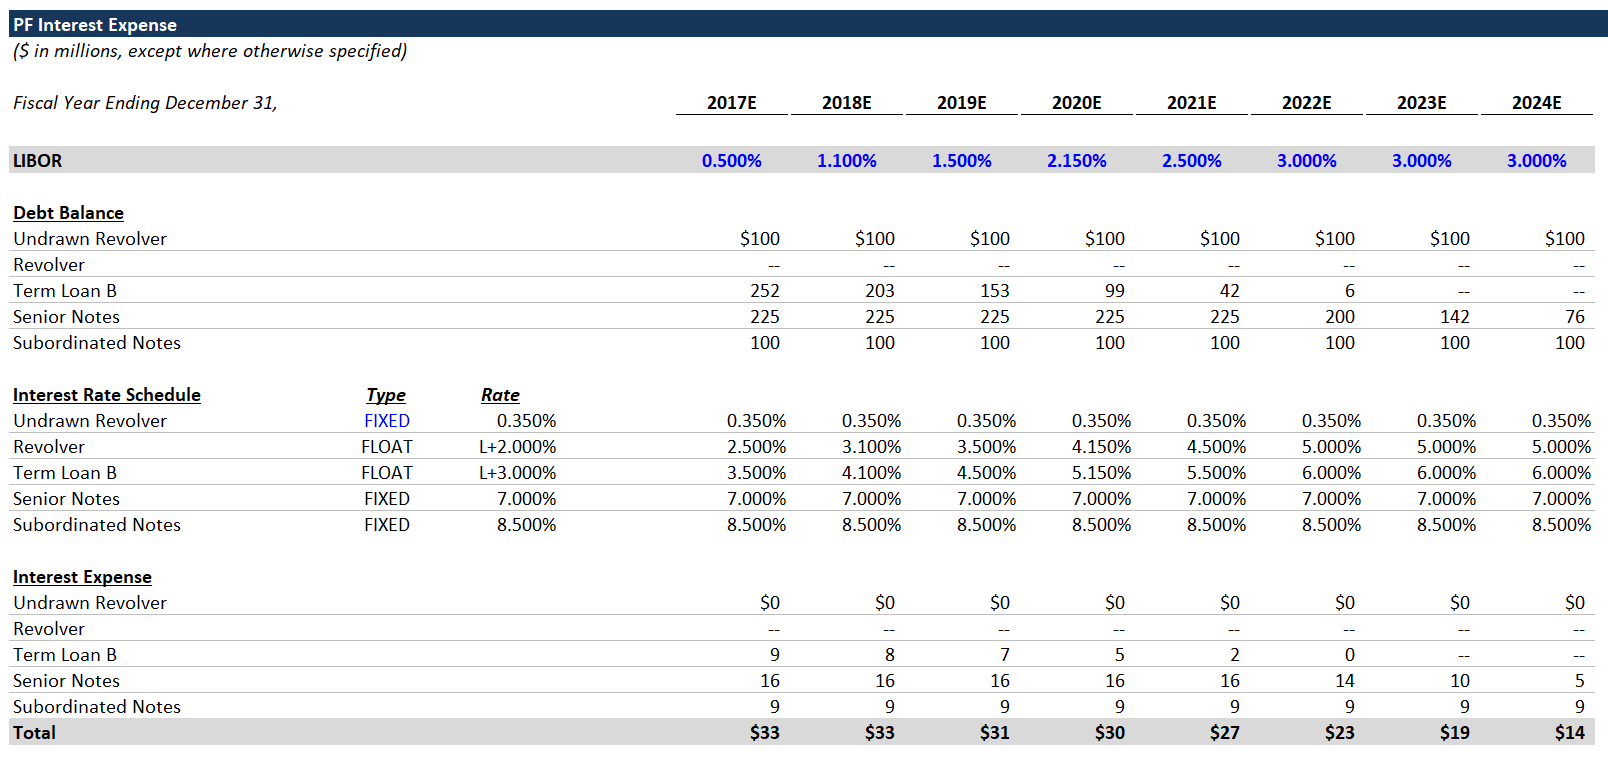
We’ve provided an illustrative LIBOR curve. If you’re unsure what this is, or what it’s used for, you should pause and read some of the debt primers provided at the beginning of this tutorial.
We include the Undrawn Revolver as a debt balance, because the company must pay a small amount of interest expense for the unused commitment.
For the Interest Rate Schedule, we’ve used a custom number format to achieve the “FIXED” vs. “FLOAT” formatting. You can google “Excel custom number format” to learn more. Here, where it says “FLOAT,” the cell value = 1, and where it says “FIXED,” the cell value = 0.
- Calculate the debt balances. For each tranche, the debt balance should be the average balance from the beginning to the end of a given year. Use the following formula, similar to what we did when calculating Cash Interest Income:
Debt balance = if (CIRC = 1, average(prior year balance, this year balance), prior year balance).
If the circ switch is off, then the interest expense will be calculated using the beginning debt balance, which removes the circular reference. - Calculate the interest rate for each tranche.
- For FIXED tranches, the interest rate should just be the stated rate.
- For FLOAT tranches, the interest rate should be the sum of LIBOR and the stated rate. We could include more advanced functionality, such as a LIBOR floor, but it would be immaterial. You can read more about the intricacies of the various debt instruments in the primers.
- Calculate interest expense for each tranche by multiplying the debt balance by the scheduled interest rate.
- When the CIRC switch = 1, interest expense is calculated with the average debt balance.
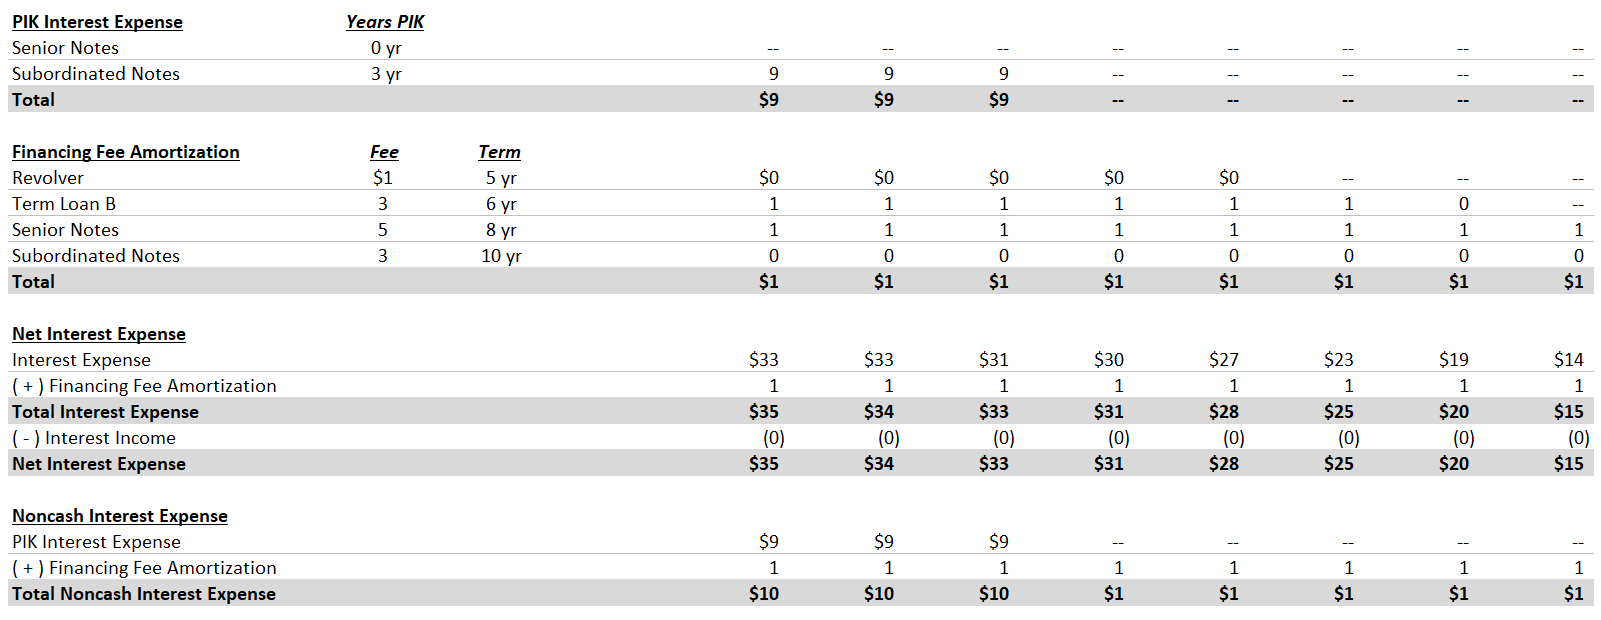
- Next we’re going to calculate the “PIK” interest for the notes. For each year, compare the number of years elapsed to the PIK term, and if the number of years elapsed is less than or equal to the PIK term, we’ll include that debt tranche’s interest expense as PIK interest.
- For the first 3 years, the subordinated notes “PIK.”
- Since PIK interest is not paid in cash, it’s deemed part of noncash interest expense, which is added back in the statement of cash flows.
Although Payment-In-Kind (PIK) interest is uncommon in the current financing environment, it pops up occasionally, and it’s an important concept to understand. When notes, or other debt, have a PIK feature, interest expense is not paid in cash for a number of years. Instead, the interest expense is added to the debt balance, so the debt balance accrues over time. PIK interest is a way for LBO investors to manipulate when cash payments occur. An investor might use a debt tranche with PIK interest expense to layer on additional debt, while keeping the interest expense manageable in the early years. The LBO investor would be counting on paying down more senior tranches of debt, alleviating some of the interest expense, before the PIK interest flips back to cash payment. This is an aggressive, riskier technique. Generally speaking, notes and mezzanine debt can have PIK interest. You can learn more about PIK interest here.
- Calculate financing fee amortization - the other type of noncash interest expense. Capitalized financing fees are amortized over the life of the corresponding debt tranche. This annual amortization is included in Net Interest Expense, but is a noncash expense. Use the following formula:
Tranche fee amortization = max(0, min(total fee - sum(prior amortization), total fee / debt term))
- In English, take the lesser of (the total fee minus cumulative prior amortization) and the calculated annual amortization.
- By locking the appropriate columns, you can drag this formula across all years and all tranches. Try to get it on your own, but compare with the completed sheet if you’ve having trouble.
Now we have all the components of interest expense. Interest Expense (including PIK interest) + Financing Fee amortization = Total Interest Expense; less Cash Interest Income = Net Interest Expense.
Likewise, we can calculate Total Noncash Interest Expense as PIK Interest + Financing Fee Amortization.
13. Putting the Pieces Together
Fixing the Debt Schedule
After calculating PIK Interest Expense, you may have realized we’re not properly accounting for it in the Debt Schedule. We’re going to fix that now. In the ending debt balance formula for the notes, add the corresponding PIK Interest Expense each year. For the first 3 years, the Subordinated Notes Ending Debt Balance should be increasing.
Adding Net Interest Expense to the Income Statement
Now, we’ll add Net Interest Expense to the Income Statement, and we’re going to include CIRC protection. This is redundant, because we already included a CIRC statement in our debt balance / Interest Expense calculation, but redundancy is better than debugging a broken model.
Use the following formula:
Net Interest Expense = if(circ=1, -Net Interest Expense from Interest Expense Schedule, 0)
Make sure you’re using net interest expense, which includes the Noncash Interest Expense and the Cash Interest Income.
Finalizing Statement of Cash Flows
Now let’s link Noncash Interest Expense into the Statement of Cash Flows as an add-back to Net Income. We do this, because Net Interest Expense reduces Net Income, but this portion of Net Interest Expense is a noncash expense. For the first 3 years, Noncash Interest Expense will be relatively high, because it includes the PIK Interest Expense.
Projected Balance Sheet
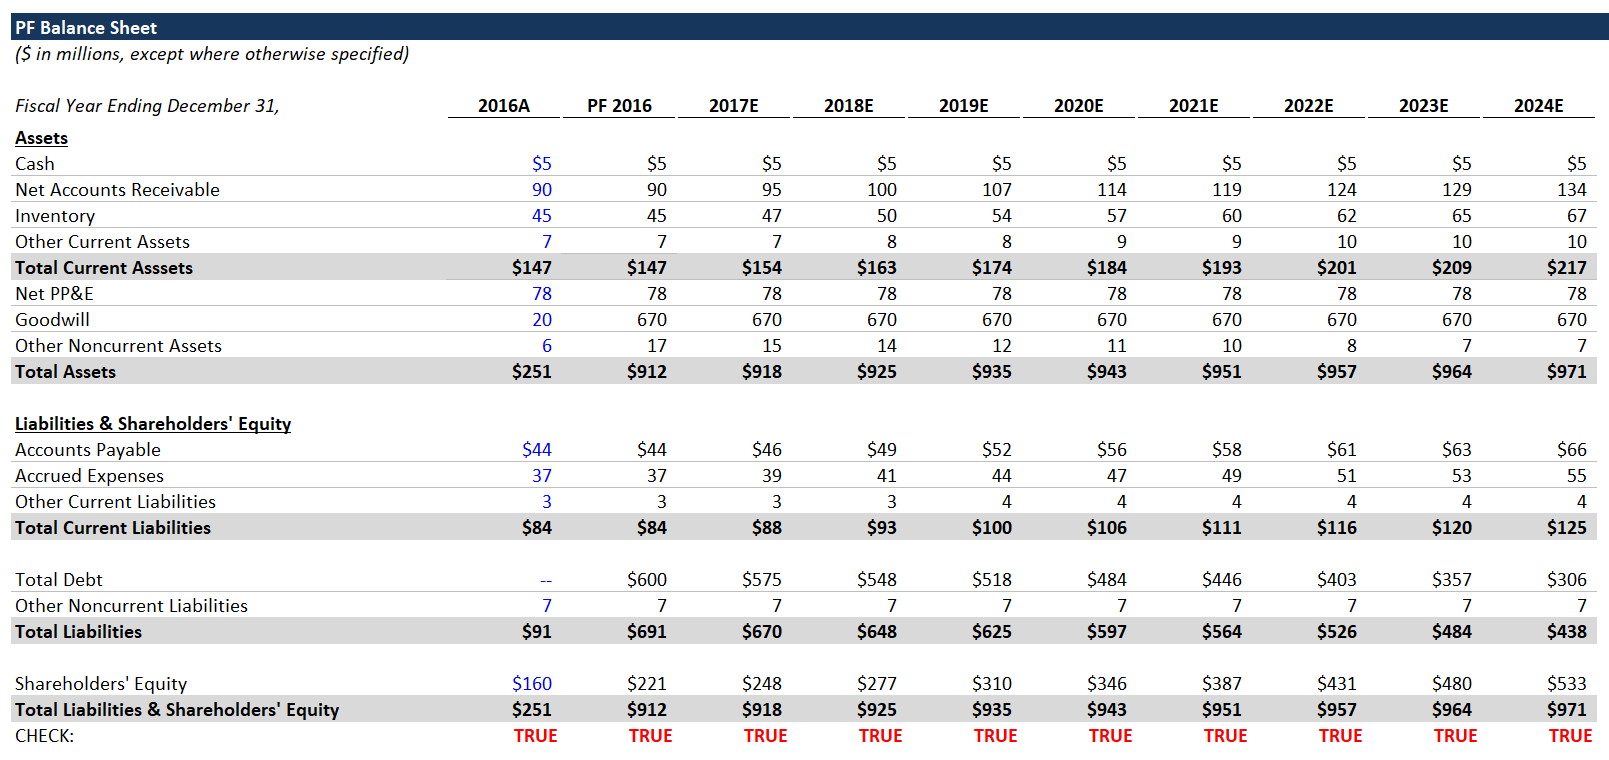
Next, we’re going to finish the Balance Sheet. The most important thing to remember when building out a projected Balance Sheet is that every line item in the Statement of Cash Flows must be reflected in the balance sheet. If there’s a single line item from the Statement of Cash Flows that is not properly incorporated in the Balance Sheet, your Balance Sheet won’t balance.
- Link Cash & Cash Equivalents in each future year to the Ending Cash on the Statement of Cash Flows.
- Link working capital line items from the Working Capital Schedule:
- Net Accounts Receivable
- Inventory
- Other Current Assets
- Accounts Payable
- Accrued Expenses
- Other Current Liabilities
These line items are accounted for in the (Increase) Decrease in NWC line on the Statement of Cash Flows.
- Keep Goodwill constant in all future years. Just set it equal to the prior year.
- Keep Other Noncurrent Liabilities constant in all future years.
- Shareholders’ Equity = prior year Shareholders’ Equity + Net Income.
- Link Debt to the corresponding total debt balance in the Debt Schedule.
- The changes in the debt balance include the following line items: Mandatory Amortization, Optional Prepayment and PIK interest (included in Noncash Interest Expense).
- Other Noncurrent Assets = prior year balance - Financing Fee Amortization for the given year.
- Now that we’re including Financing Fee Amortization, we’re fully incorporating the Noncash Interest Expense line from the Statement of Cash Flows.
- Net PP&E = prior year Net PP&E + CapEx - D&A.
- Basically, it grows every year by the amount of new capitalized assets less D&A. It’s constant here, because as a simplifying assumption, we’ve made CapEx = D&A.
The balance sheet should now balance, because we’re incorporating all line items from the statement of cash flows.
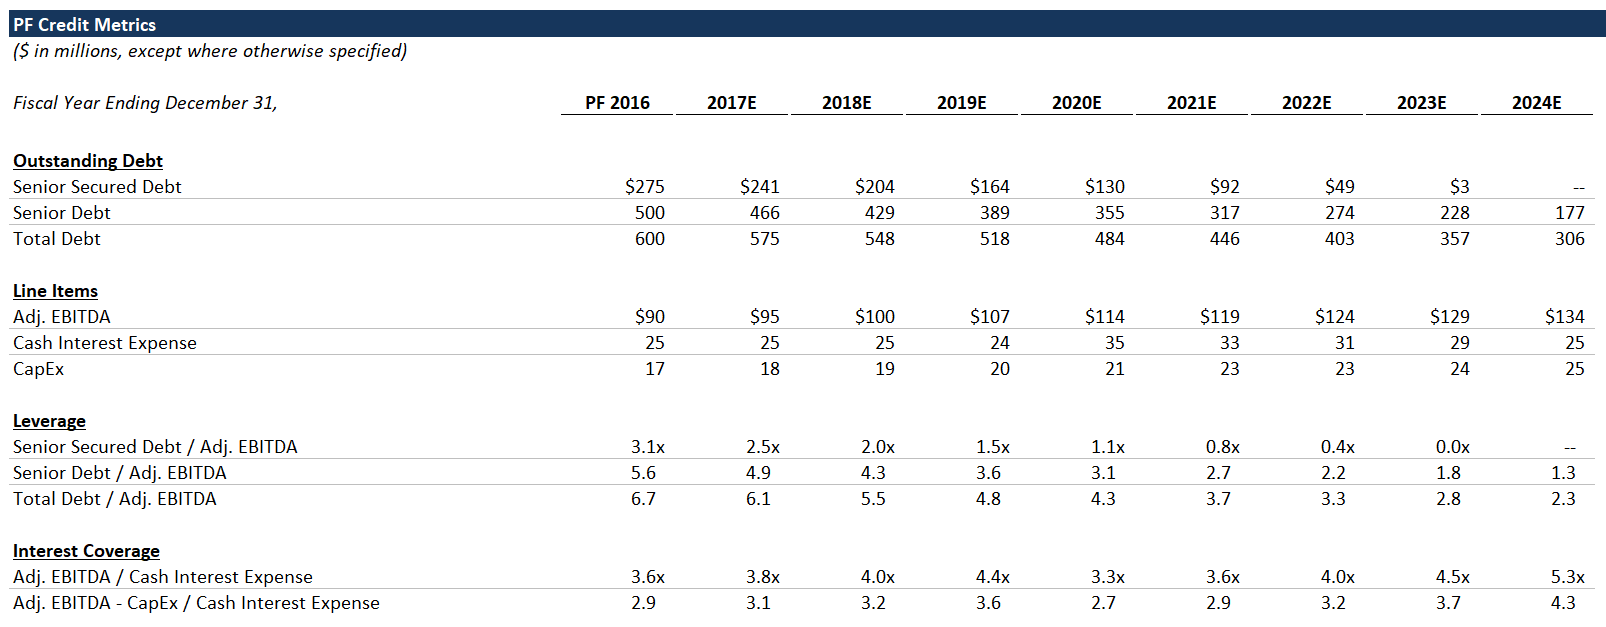
14. Credit Metrics
Every LBO model should include basic credit metrics, because these metrics and the credit profile will inform debt investors’ appetite to fund the transaction. They indicate the potential credit risk.
Credit Ratios
The two main types of credit ratios are leverage ratios and interest coverage ratios:
- Leverage ratios - compare the amount of debt and the company’s cash flow (EBITDA).
- Interest coverage ratios - compare the company’s cash flow (EBITDA) and the annual interest expense burden.
- Link to the corresponding debt balances along with the EBITDA and CapEx.
- Senior Secured Debt = Revolver + Term Loan B
- Senior Debt = Revolver + Term Loan B + Senior Notes
- Cash Interest Expense = Total Interest Expense (before Financing Fee Amortization and Cash Interest Income) - PIK Interest Expense.
- For 2016 Cash Interest Expense, I generally set it equal to 2017 Cash Interest Expense as a shortcut. A better way is to calculate the full amount of Interest Expense (i.e., the starting debt balances multiplied by the applicable interest rates, less any PIK’d interest).
- 2017 Cash Interest Expense should be lower than that amount, because debt is paid down over the course of the year, which leads to a lower average debt balance.
- Fill out leverage and interest coverage ratios.
- The ratios should be pretty self-explanatory, but refer to the completed sheet in case you have any issues.
15. Sponsor Returns
MoIC and IRR
When performing a LBO analysis, we measure sponsor returns using the Multiple of Invested Capital (MoIC) and the Internal Rate of Return (IRR). Sponsors get paid based on MoIC, but their investors care about IRR, so both are important. Even if a particular investment has a lackluster IRR, a decent MoIC is good for the sponsor, because they get a share of the dollar profits (not based on IRR). That being said, the fund IRR will be important for marketing their next fund to investors.
MoIC is literally the multiple of money made, e.g., the sponsor and its investors made 3x their money. IRR is the discount rate that would be required in order for the sponsor to achieve a $0 NPV from the investment. These are closely related concepts - the difference is that IRR takes into account the timing of cash flows, whereas MoIC measures only the dollars. You can Google to learn more.
Exit Multiple Sensitivity
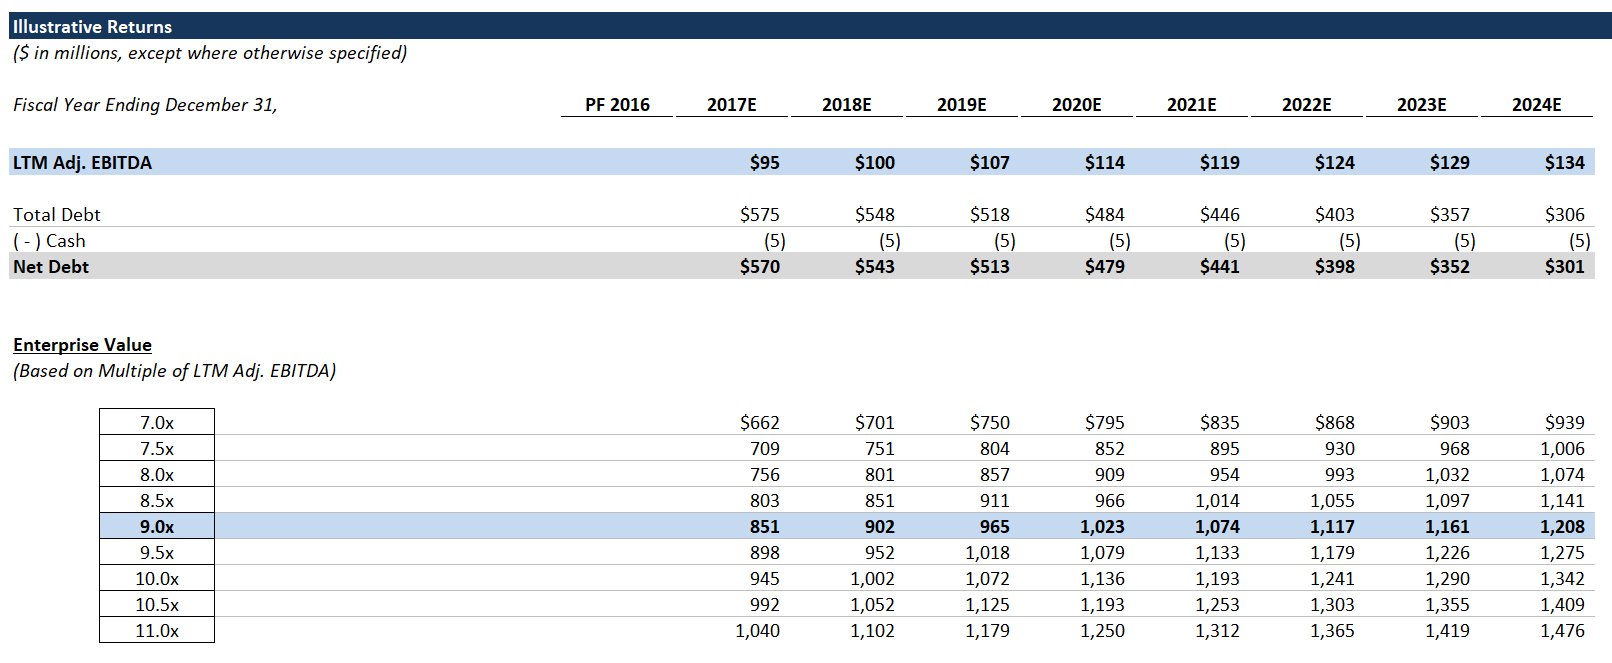
Using line items from the rest of the model, and a range of exit multiples, we’ll calculate the sponsor’s returns (MoIC and IRR). Showing a range of exit multiples is helpful, because it highlights the impact that the exit multiple can have on returns. PE firms often hold investments 5+ years, and the valuation of a particular asset can shift dramatically over that time frame. In the best case scenario, the sponsor buys an asset at the bottom of the cycle, and valuations subsequently skyrocket. An exit multiple that’s substantially higher than the entry multiple is a great way to make money, but the opposite can happen, too.
When a sponsor sells an investment for an exit multiple that’s higher than the entry multiple, that’s called Multiple Expansion. It’s an elusive, mythical beast, and you can read more about it here.
Start by linking Adj. EBITDA, Debt and Cash.
Calculate Net Debt.
Calculate Enterprise Value based on the exit multiples on the left (Enterprise Value = exit multiple x LTM Adj. EBITDA).
- The highlighted row corresponds to the entry multiple (i.e., constant entry and exit multiples).
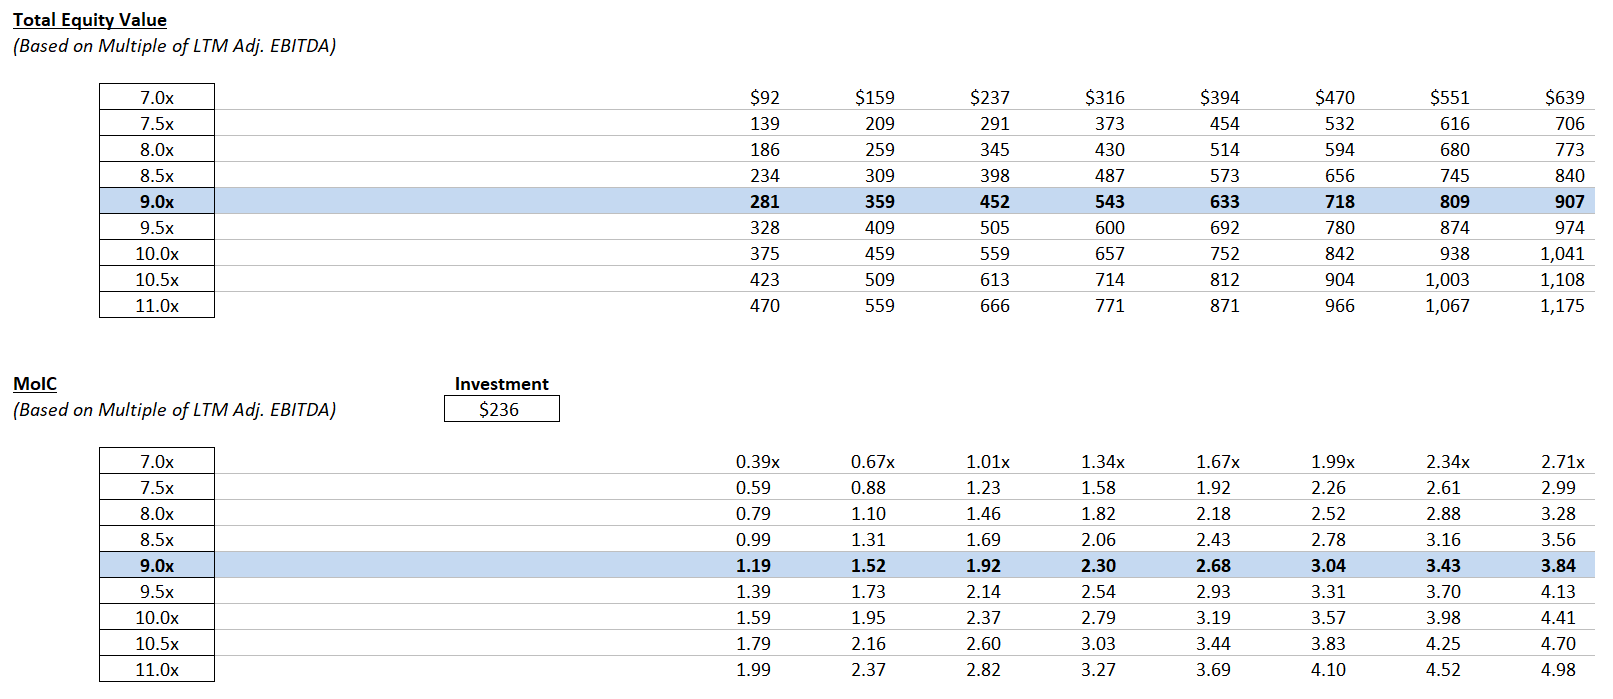
Equity Value = corresponding Enterprise Value (which varies by exit multiple) - Net Debt.
Set Investment equal to the total equity invested: Sponsor Equity + Management Rollover.
- In a real transaction, there would be a complicated split of investment proceeds between management and the PE firm. A higher-level analysis, like this one, generally just lumps them all into one bucket.
Calculate MoIC by dividing Equity Value by Investment.
Above the IRR section, add a row for the number of years elapsed. This will make it easier to calculate the IRRs. You can enter the years elapsed manually or you can use the Year function:
Years Elapsed = Year(current column date) - Year(PF 2016 date).
(You can refer to the date row at the top of the returns schedule).Calculate IRR with the following formula:
IRR = MoIC ^ (1/ Years Elapsed) - 1

Next Steps
Congrats, you’ve completed the training LBO!
Try the rest of our private equity modeling tutorials: